Sign in to the Microsoft Entra ID portal using your Microsoft Entra ID administrator
account and navigate to "Microsoft Entra ID" ->
"Enterprise Applications" ->
"New Application" ->
"Create your own application", enter the name of your Application
(e.g. ISL Online Cloud), select
Integrate any other application you don't find in the gallery (Non-gallery)
option and click Create.
Step 2
Select Set up single sign on option.
Step 3
Select SAML Single Sign-On method.
Step 4
Click on Edit in the
Basic SAML Configuration section.
Step 5
Set the following fields:
Identifier (Entity ID): https://www.islonline.net/sso/saml/sp/domain/<domain>/metadata.xml Reply URL (Assertion Consumer Service URL): https://www.islonline.net/sso/saml/sp/domain/<domain>/acspost Sign on URL (Optional): https://account.islonline.net/users/isllight/start.html Log out URL (Optional): https://account.islonline.net/sso/saml/sp/domain/<domain>/slopost
Use the SAML 2.0 endpoint URLs that you received from
Step 4
of the SSO Configuration. Mark your Identifier (Entity ID) and
Reply URL entries as default. Review the information and click
Save.
Step 6
Click Edit under the Attributes & Claims
section.
Step 7
When a user authenticates, Microsoft Entra ID will issue a SAML token to ISL
Online Cloud, that contains unique information about the user. A unique User Identifier (Name ID)
specifies the claim, which will uniquely identify the user on the ISL Online
Cloud (username). Unique user identifier and email are mandatory user claims.
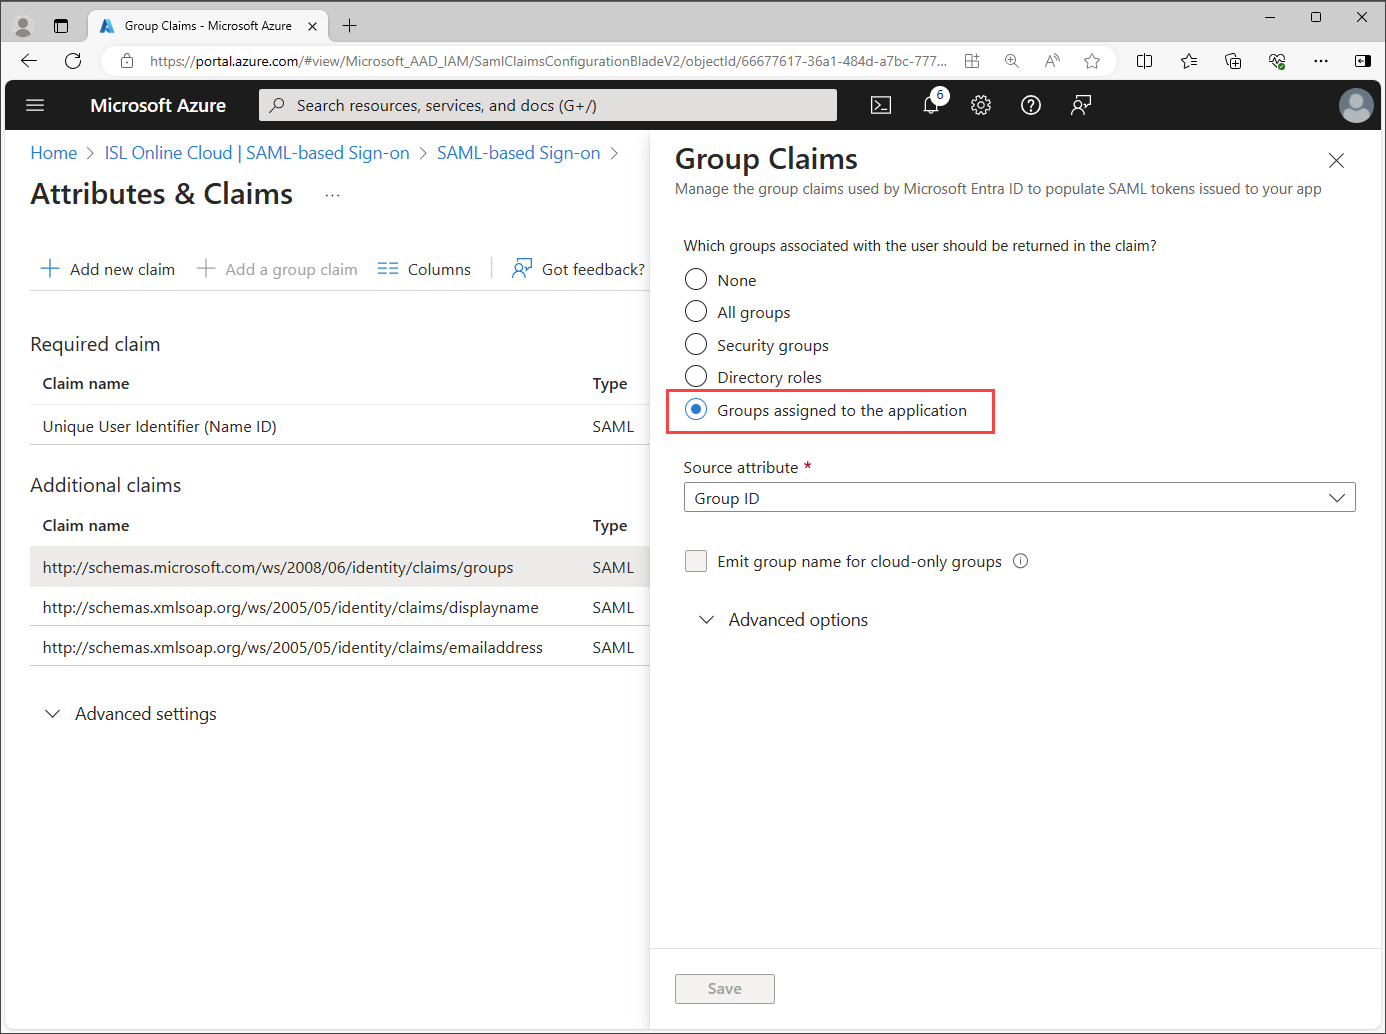
You can add additional claims, which will send the full name and list of user
groups of the user.
Username (mandatory): Unique User Identifier (Name ID) E-mail (mandatory): http://schemas.xmlsoap.org/ws/2005/05/identity/claims/emailaddress Full name (optional): http://schemas.xmlsoap.org/ws/2005/05/identity/claims/displayname User groups (optional): http://schemas.microsoft.com/ws/2008/06/identity/claims/groups
Store the SAML claim names you have set up, as you will need to include them
in the SSO configuration later.
Important: In larger organizations the number of groups
a user is a member of may exceed the ISL Online Cloud limit, that is 100
groups per user. If your user's group membership count exceeds this limit,
we recommend restricting the groups emitted in claims only to the relevant
groups for the application.
Step 8 (optional)
In the Verification Certificates section, click
Edit. Check
Require Verification Certificates and select
Upload certificate.
Before uploading the certificate which you saved on
Step 4
of the SSO Configuration, you will have to rename it to
".cer" instead of ".cert".
Example of a valid Certificate:
sso-dn1983791873298739287-20250529-saml-sp.cer
Review the changes and click Save.
Step 9
Users must first be assigned to the application before being able to access it.
Select User and groups from the Enterprise application panel
and add users or user groups, who will have access to your ISL Online Cloud application.
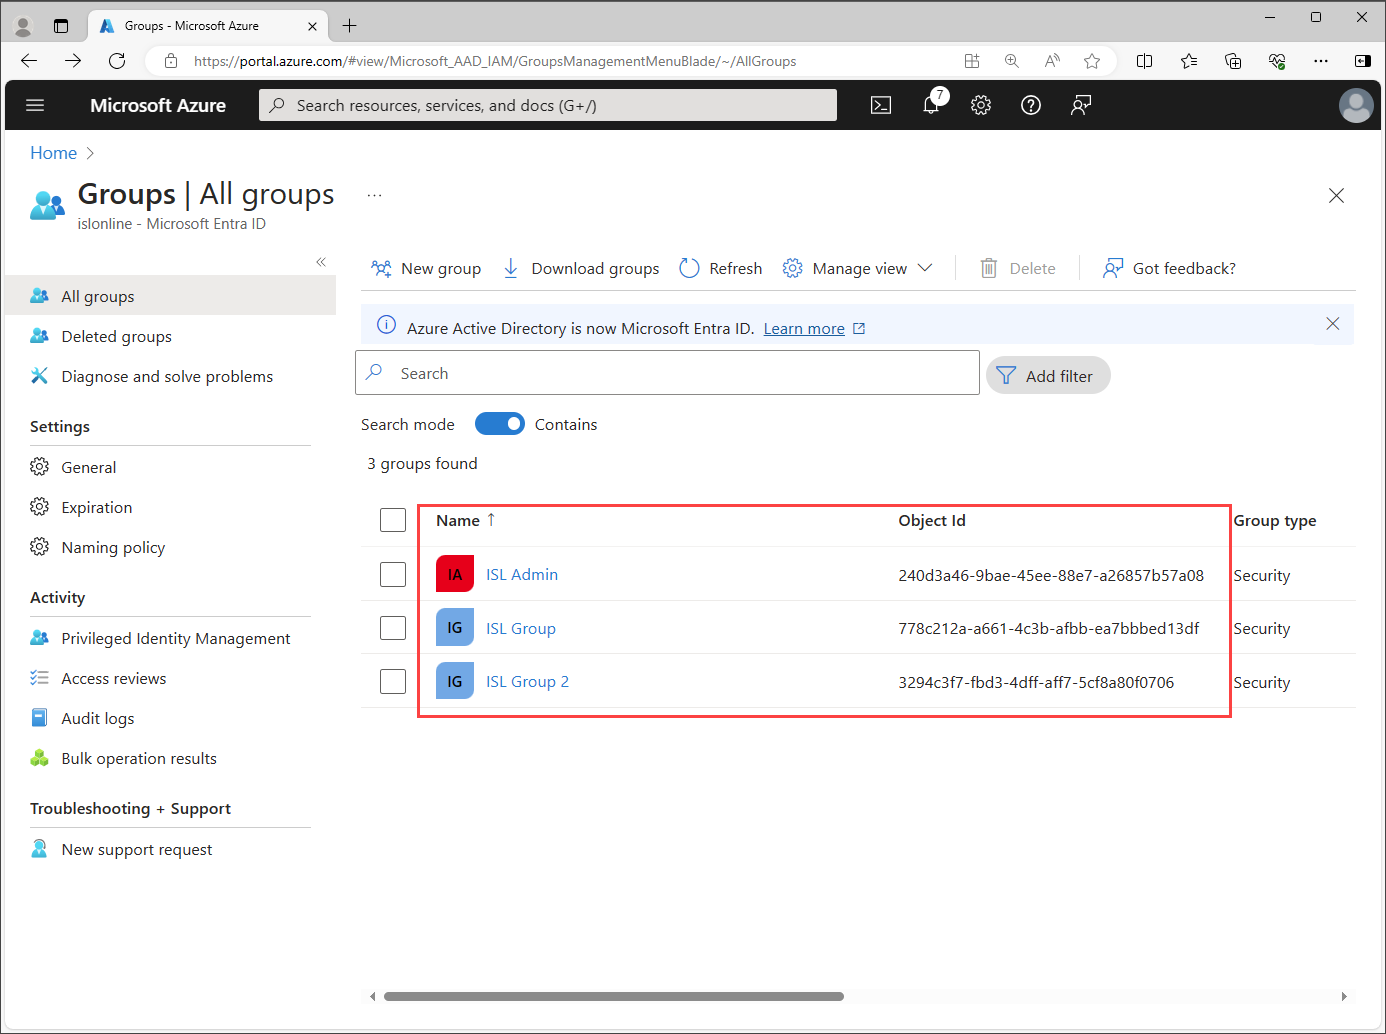
Important: If you have set user group claim in
Step 7 and assigned user group to your SAML application,
store Name and Object Id of all
user groups assigned to the application, you will need to include them in
the SSO configuration later.
Step 10
You are now finished with basic EntraID configuration, copy the Microsoft Entra
ID metadata XML URL link by clicking on the Copy to clipboard
button beside App Federation Metadata Url. Store the App
federation metadata XML URL as you will need to include it in the SSO configuration
later.
Proceed with the
Step 4
of the Basic SSO configuration.